Tampilkan postingan dengan label guide. Tampilkan semua postingan

How To Install Drivers With No EXE Extension

Posted by Unknown Kamis, 28 November 2013 0 komentar
If you have been thinking of a way to install drivers that do not have the executable file, well you are not alone in this. 

Not so many people are knowledgeable about things like that. With executable file (.exe) the installation proceeds when you click without the need to go to Control Panel but with a non-executable file, you would need to go to the device itself and execute the installation. Sometimes, Windows Update can go online to find and install these drivers and sometimes it may not install it. 

However, its pretty easy to install drivers when only the core files are present with no executable file.

Follow the guide below to successfully install the drivers for a device. All drivers can be installed this way

Procedures

1. Download drivers and place them in a folder. For this tutorial, am using TECNO A+ drivers which I have downloaded into a particular folder.

2. Click on Control Panel and Select Device Manager. This would display various hardware attached to the computer. If the drivers for a certain hardware is connected to the computer but the driver is missing, it will show a yellow caution sign as seen in the image below.

 
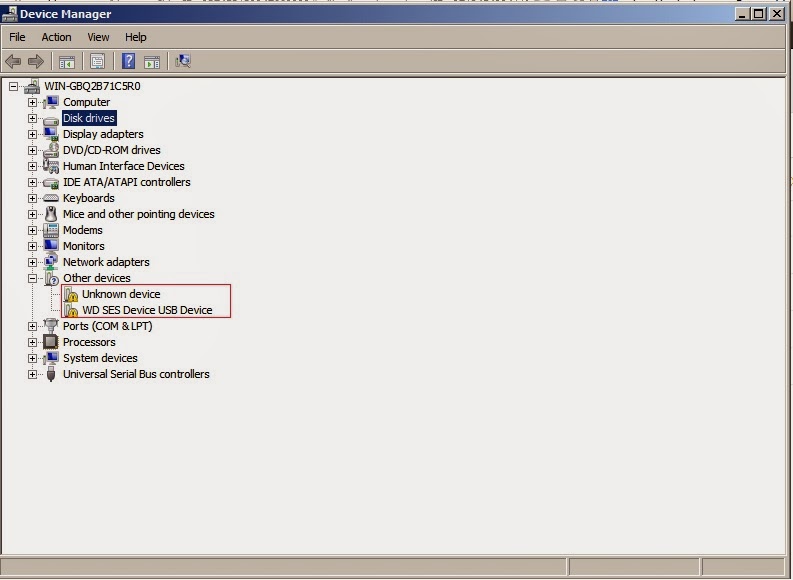
3. Making sure the hardware device is connected, from the Device Manager, locate the hardware name and you would see the caution sign. For example, In the image above, you would see something similar WD SES Device USB Device with the caution sign.

4. Right Click on it and select Update Driver Software


5. Select Browse my computer for driver software


6. Click on Browse and navigate to the folder you saved all your downloaded drives.


7. Click OK and then click Next and then let Windows install the drivers for you.


At the end of the installation, drivers will be correctly installed and device would be identified without the caution sign.

For more smartphone helps, tutorials and gists, like our Facebook page and follow on Twitter.


Baca Selengkapnya ....

How To Free Up Internal Memory Space On Android Phone

Posted by Unknown Rabu, 27 November 2013 0 komentar
Is your Android phone internal memory space running low? Don't worry, there is a fix for it and its pretty easy. 

Having experienced it myself, I looked for solutions to it and I got a few tricks that works. 

The steps to fix this issue are highlighted below. 

1. One of the ways to free up space is to move apps to SD card.  You can do this in the simplest way or in a more cumbersome way.

The simple way is to download App2SD (App Mgr III) app on Google Play Store (it needs your phone to be rooted for it to work).
Once installed, it will show you various apps installed on your phone internal storage and SD card storage. It will also show lists of apps that can be moved to SD card, those that can't be moved and the percentages of free space left on both memory types as indicated in the images below.


Now all you have to do is tap on any apps listed in the "Movable" section and move these apps that are movable to your SD card. This will free up space on your internal memory.

The cumbersome way which would bring you finally to the place to move apps to your choice storage is to go to Settings/Apps, click on individual app to see if you can move it to SD card. If you can move to SD card, just tap on Move to SD storage or Phone Storage as applied to your device.

Its cumbersome because you have to check each app one after the other to know if its movable or not. If its not movable, it would be greyed out and you won't be able to click on "Move to Phone Storage" button.

2. Another thing that eats internal memory space is apps cache, especially those apps that aren't movable to SD card, high volume SMS messages, voluminous call logs and browser history and caches. 


To fix this, just download an app called 1 Tap Cleaner (free in Google Play Store). Once it's downloaded, launch and click on History. This would bring up a window which you can then clear history etc. 


You can do same for Call log/text message or just click on Clear All to allow the app automatically work its magic. Once this is done, you would notice a sizable space on your internal memory. 


3. Finally, we are all in the habit of installing apps that we hardly use or don't use at all.
Try and uninstall apps you don't need, especially those apps in internal memory alone. 

Now assuming you have done all the steps above, you should have some space on your internal memory. But, if you still have serious issues on your phone internal memory, your final step is to reset the phone. This would return the phone to factory settings so that all the junks clogging the internal memory are wiped out. 
Ideally, only the internal memory files would be removed, all SD files will remain.

In other to reset, go to Settings, scroll down and click on Backup & Reset and then click on Factory data reset, finally, click on Reset phone.

Once the device is reset, you phone will reboot and be as new.

Like our Facebook page and follow us on Twitter for more smartphone tips and helps.


Baca Selengkapnya ....
Trik SEO Terbaru support Online Shop Baju Wanita - Original design by Bamz | Copyright of samsung galaxy blaze.